Dusk ITN Rehberi
Dusk'ın Teşvik Edilmiş Test Ağı için Bir Düğüm Nasıl Kurulur?
Dusk nedir?
Dusk, gerçek dünya varlıklarını (RWA'lar) tokenize etmeyi amaçlayan, gizlilik odaklı bir L1 blok zinciri protokolüdür. Sıfır bilgi teknolojisini kullanarak küresel düzenlemelerle uyumlu bir gizlilik çözümü sunmayı amaçlamaktadır.
Dusk ITN: Teşvikli Testnet
Dusk, katılımcıları düğümler kurmaya ve bunları test ağı boyunca çalıştırmaya çağırıyor. %75'in üzerinde çalışma süresine sahip düğüm koşucuları, 250.000 DUSK token'lik ödül havuzunu paylaşmaya hak kazanacak. Çalışma süresi, başlangıç tarihinden bitiş tarihine kadar hesaplanmaya başlanacaktır.
- Başlangıç tarihi: 20 Şubat 2024 00:00 CET
- Bitiş tarihi: 15 Mart 2024 23:59 CET
Bağlantı
Donanım gereksinimleri
Dusk'ın üç tür düğümü vardır: Sağlayıcı, Kanıtlayıcı ve Arşivleyici. Testnet için sadece bir Provisioner düğümü kurmamız ve çalıştırmamız gerekiyor.
Dusk'ın Provisioner düğümü için donanım gereksinimleri oldukça hafiftir:
- 2 çekirdekli CPU (x86/AMD kullanmanızı öneririm.)
- 4 GB RAM bellek
- 50 GB depolama alanı
- 10 Mbps bağlantı
Düğümümün 7/24 açık olmasına izin vermek için bu özellikleri karşılayan bir VPS kullanacağım.
Hetzner'in CPX21 bulut sunucusunu kullanmanızı öneririm:
Bana bir iyilik yapın ve referans bağlantımla kaydolun — ayrıca 20 € değerinde Hetzner Cloud kredisi alacaksınız.
Birçok farklı VPS sağlayıcısı denedim ve en iyi fiyat ve performans dengesi olarak Hetzner'i öneriyorum. Ayrıca, aylık yerine saatlik faturalandırmanıza izin verirler, bu da projeleri başlatma/bitirme konusunda daha fazla esnekliğe sahip olduğunuz anlamına gelir.
Kurma
1. VPS Sağlayıcısının Güvenlik Duvarı Ayarlarını Yapılandırın
VPS sağlayıcınızın kontrol panelinde, güvenlik duvarı kurallarını şu gelen bağlantılara izin verecek şekilde yapılandırmanız gerekir:
- UDP: Bağlantı noktası 9000
- TCP: Bağlantı noktası 8080
- TCP: Bağlantı noktası 22
UDP, bu ayarları web sitelerinin kontrol panelinden manuel olarak yapılandırmadığınız sürece VPS sağlayıcınız tarafından varsayılan olarak engellenecektir.
2. Başlarken
I will run my node from a VPS running Ubuntu 22.04.
I have connected to the VPS from a virtual machine that is also running Ubuntu 22.04 by using from the terminal.ssh
I am starting connected to the VPS in , and I will stay in to run the node.rootroot
I tried running the node from a user account but it couldn’t connect to the network — there was an issue with ports 9000 and 8080. However it is able to connect to the network when running from .root
a) Change timezone if necessary:
sudo dpkg-reconfigure tzdata
b) Run updates:
sudo apt update && sudo apt upgrade -y
c) Install tools:
sudo apt install -y git tmux vim ccze curl nmap
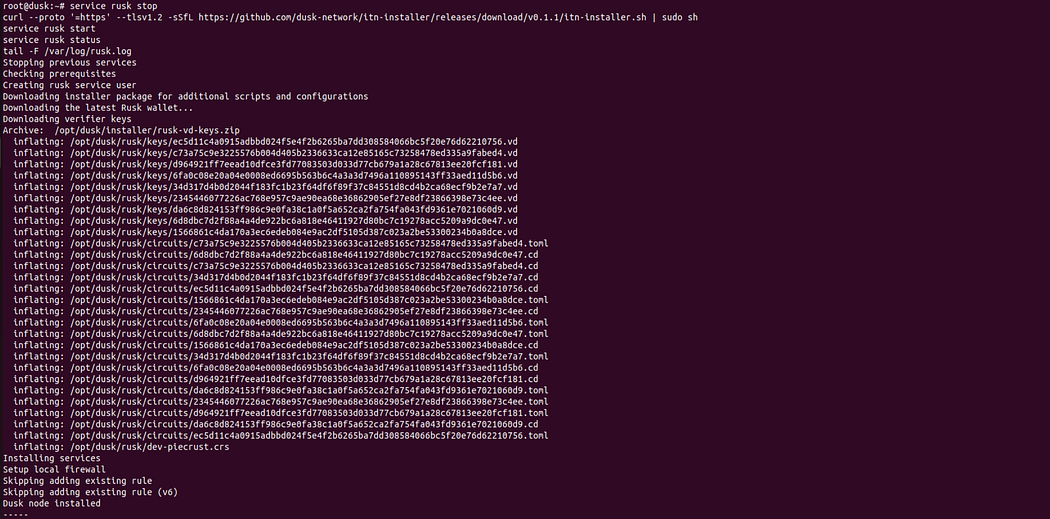
3. Install Rusk
a) Run this command:
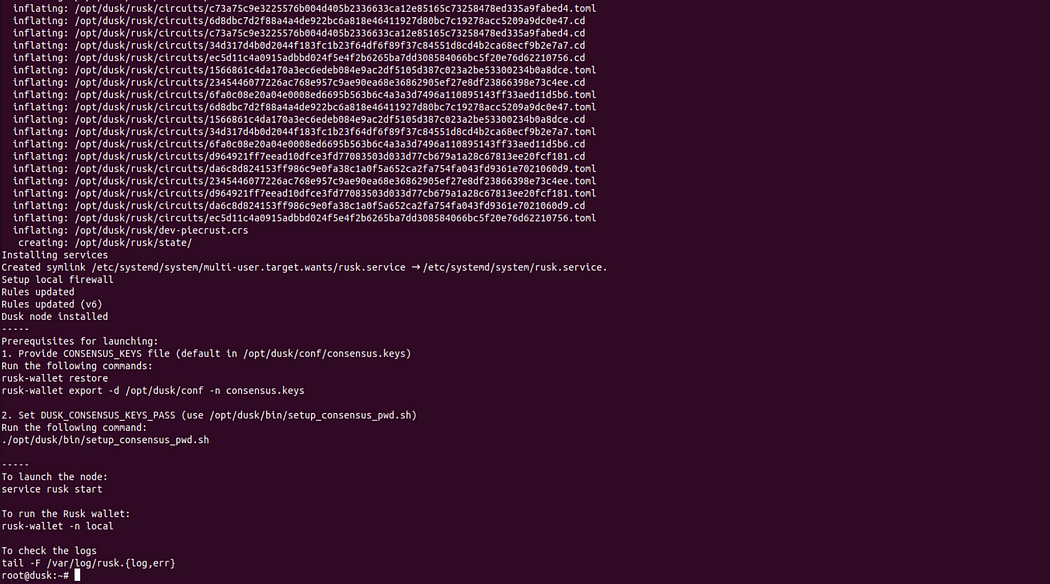
curl --proto '=https' --tlsv1.2 -sSfL https://github.com/dusk-network/itn-installer/releases/download/v0.1.6/itn-installer.sh | sudo sh
This will download the ITN installer and the dependencies it needs to install and run Rusk. Check the latest version here.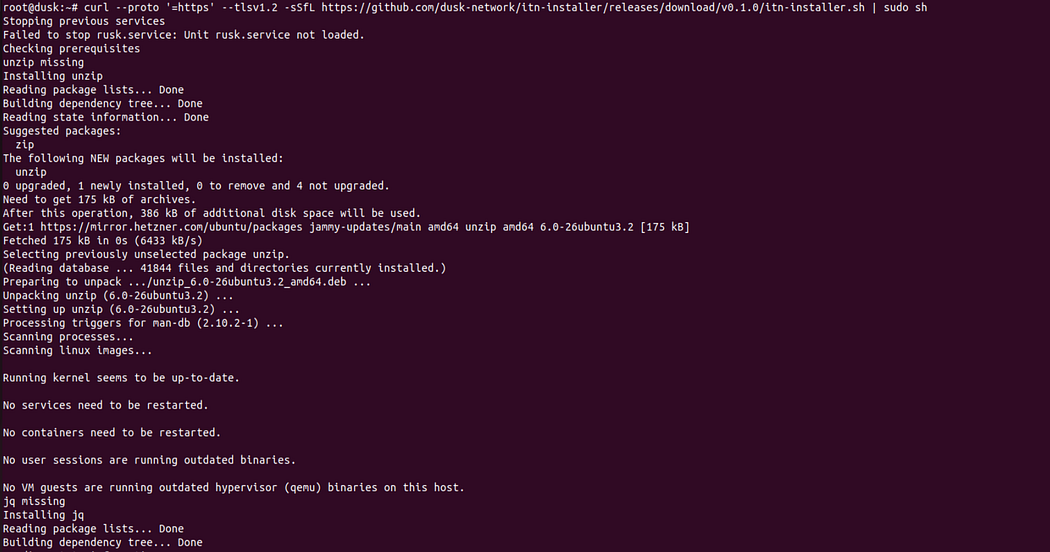
4. Get Testnet Tokens
a) If you don’t already have a wallet, go here and create a web wallet.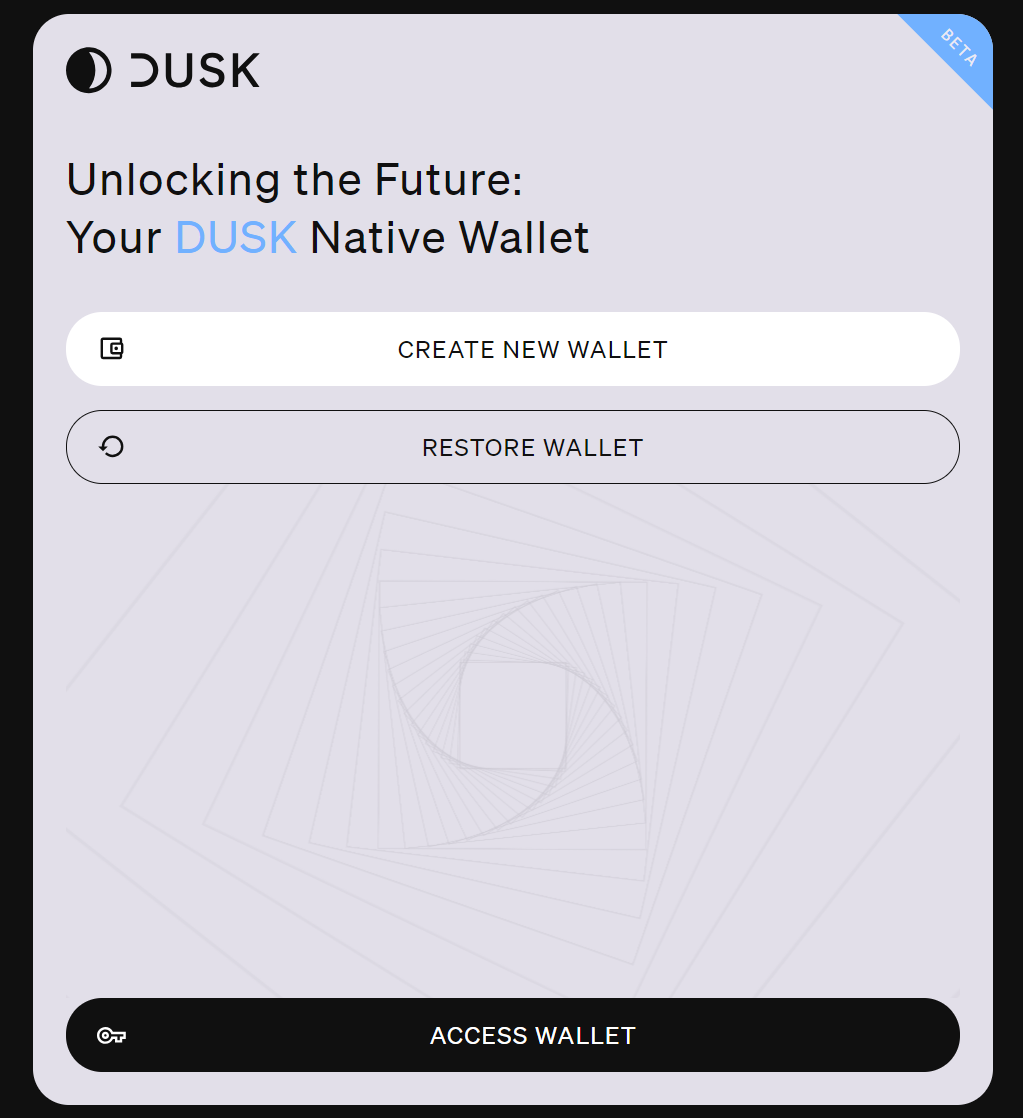 Click on “CREATE NEW WALLET”, then accept the terms.
You need to take a note of your mnemonic phrase — KEEP IT SAFE AND DON’T SHARE IT WITH ANYONE!
Finally, set a password. b) Request tDUSK tokens from the faucet:
First, visit the Dusk Discord server.
Start a private message session with the Dusk Testnet Faucet bot and send this message:
!dusk
Wait for it to reply, then send your wallet address and it will send you 1100 tDUSK tokens.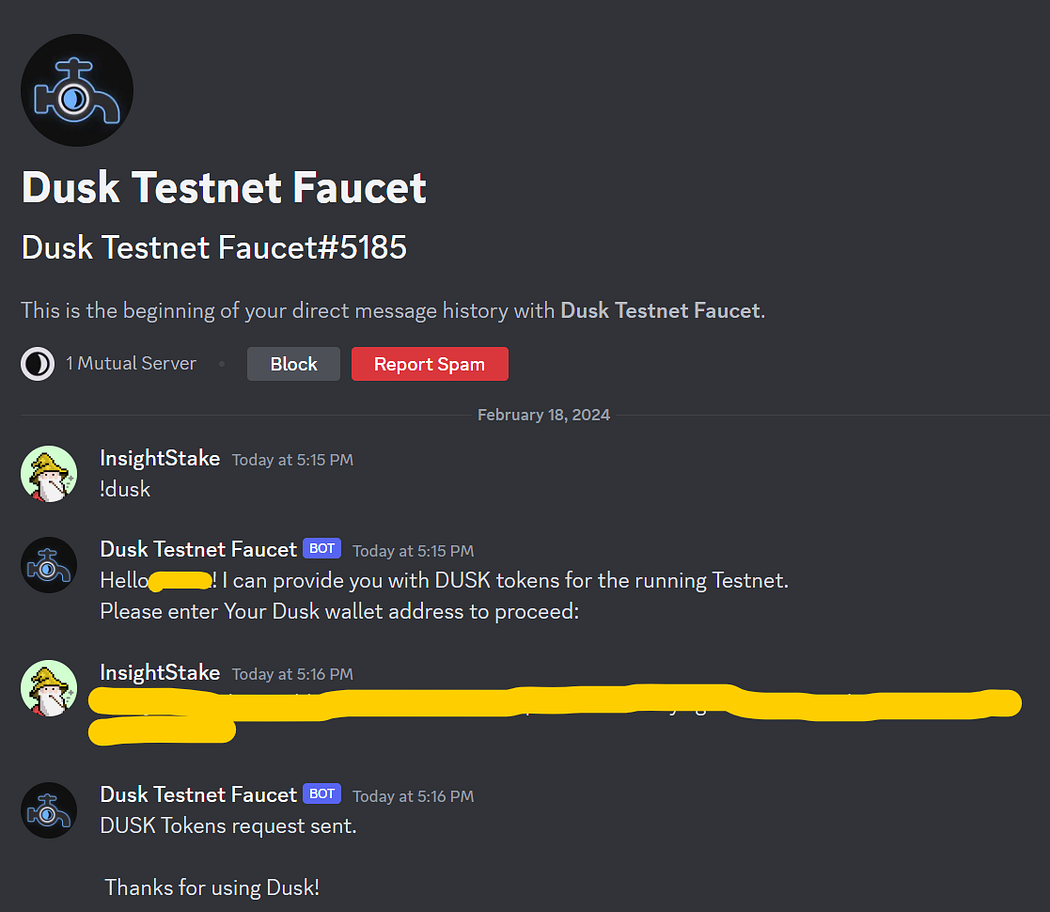 It can take some time for these tokens to arrive (it took about 24 hours for me), but they will show up in your web wallet:
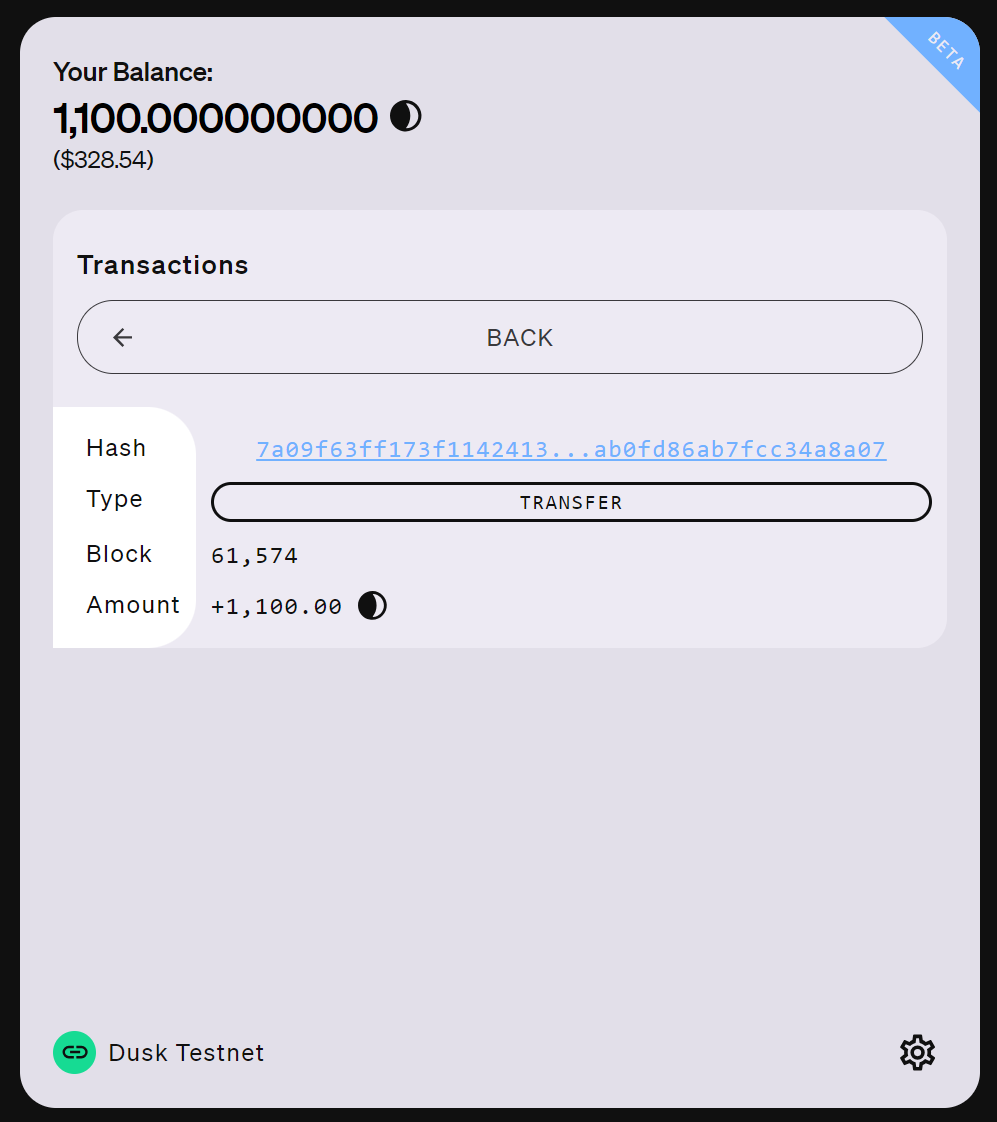
5. Import Your Wallet
a) Import your wallet to your VPS using the Rusk CLI:
rusk-wallet restore
Enter the mnemonic phrase you saved when you created your web wallet. You also need to set a password for your wallet. b) Export a consensus key for the wallet:
rusk-wallet export -d /opt/dusk/conf -n consensus.keys
You need to enter your wallet password, then enter a new encryption password (they can be the same, but probably shouldn’t be…) d) Set the encryption password as an environmental variable:
sh /opt/dusk/bin/setup_consensus_pwd.sh
You need to enter the encryption password and then hit .Enter
6. Start the Node
a) Start Rusk:
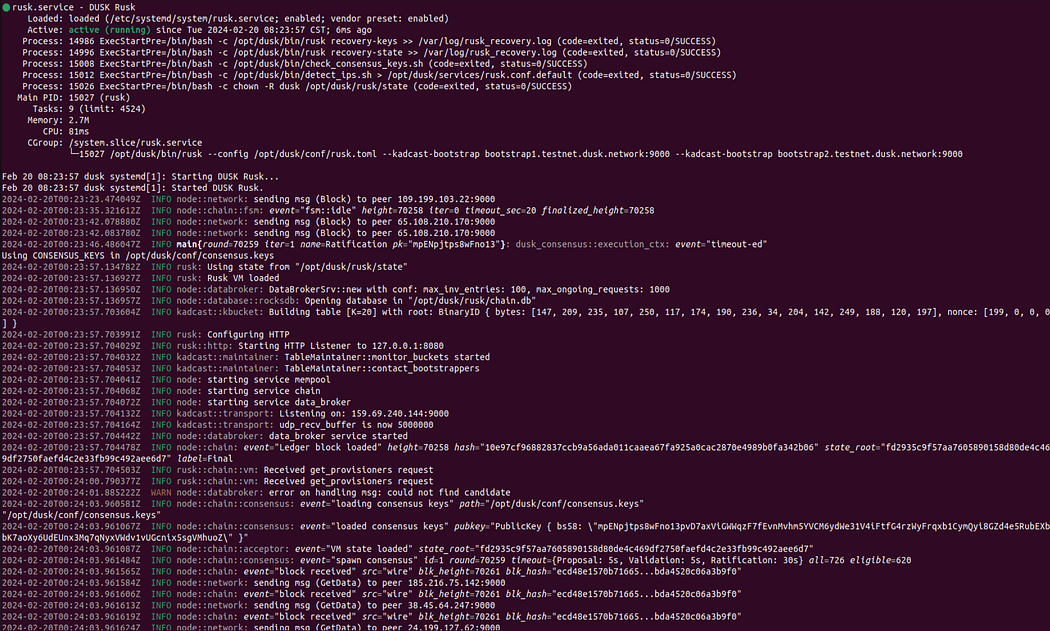
service rusk start
service rusk status
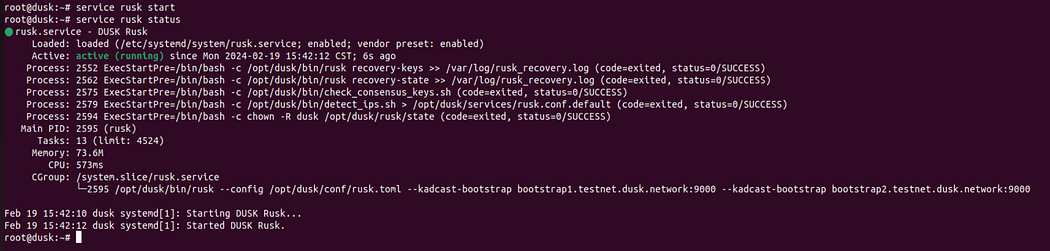 It should show that it is “active (running)”.
Your node will start syncing with the network. Check its status with this command:
cat /var/log/rusk.log
or, for a persistent log:
tail -F /var/log/rusk.log
It should look like this: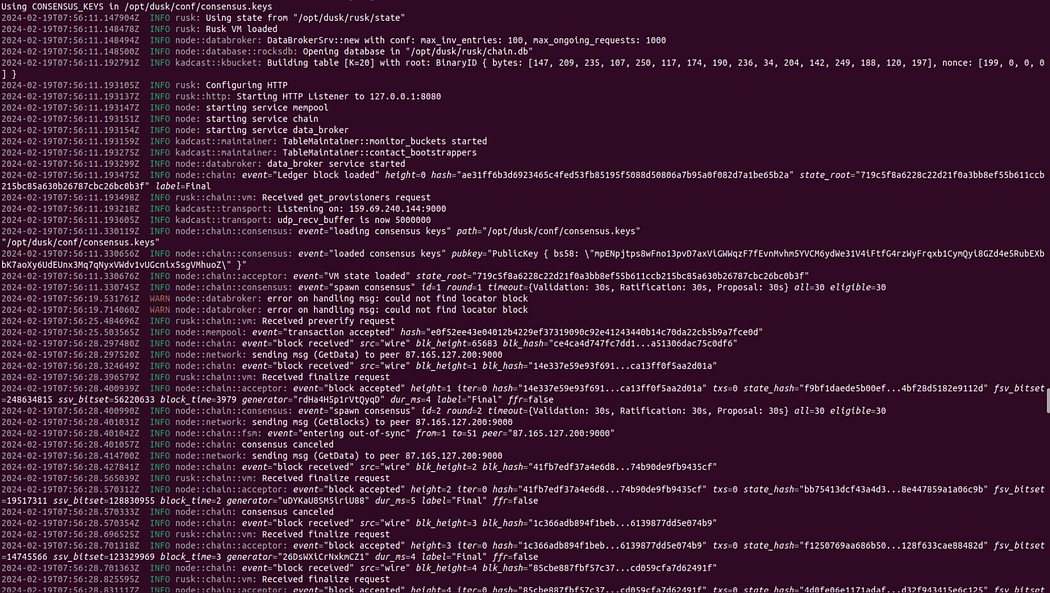 Node is syncing
NOTE - If you get an output like this with these error messages: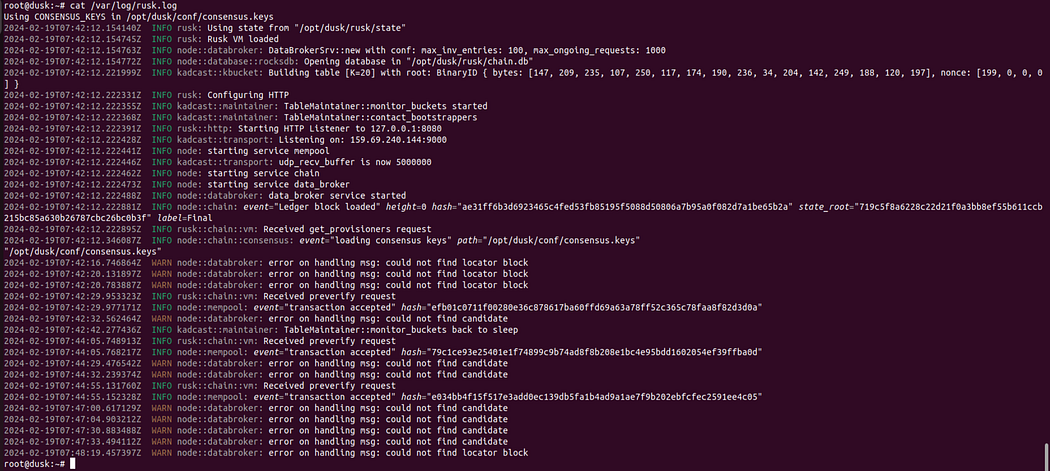 The node is failing to sync
WARN node::databroker: error on handling msg: could not find locator block
WARN node::databroker: error on handling msg: could not find candidate
It is probably because you entered your consensus key passwords incorrectly.
Remove the consensus keys and recreate them by running:
service rusk stop
rm /opt/dusk/conf/consensus.keys
rusk-wallet export -d /opt/dusk/conf -n consensus.keys
And:
sh /opt/dusk/bin/setup_consensus_pwd.sh
Then just restart the node with:
service rusk start
Check the output to make sure it is syncing.
Once the node has connected to the netowrk, it will begin syncing, which you will be able to see with:
grep "block accepted" /var/log/rusk.log | tail -n 5
 This shows the 5 latest log messages
Use the explorer to check for the latest block. My node has synced to block 50639 but the latest block is 67838, so still some time to go.
You will only begin producing blocks when your node has finished syncing and holds the minimum required stake — 1000 tDUSK.
7. Stake Your Testnet Tokens
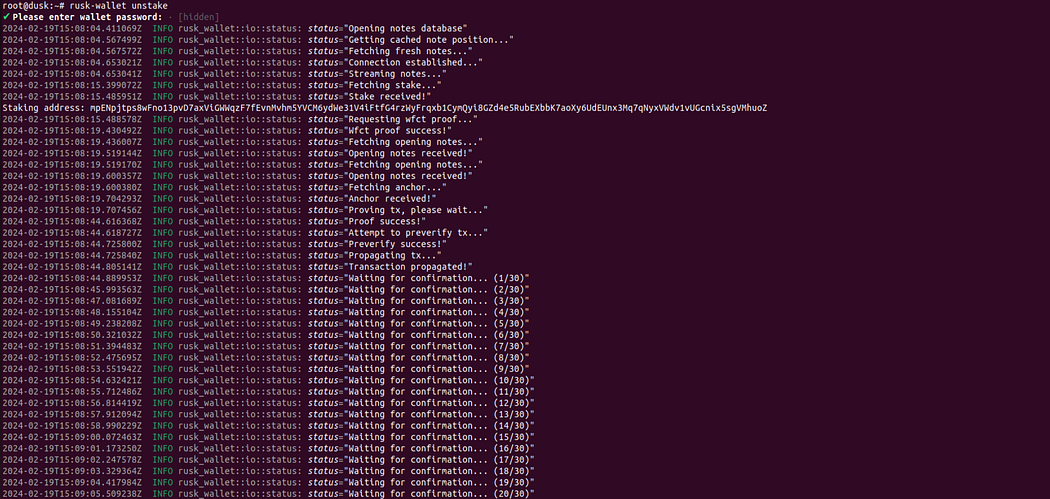
a) Stake your tDUSK with this command:
rusk-wallet stake --amt 1000
You will be prompted to enter your wallet password and then it will process for some time. You may also need to attempt this multiple times as it can timeout. My first 3 attempts all timed out
 My 4th attempt was successful
b) View the stake on your node:
rusk-wallet stake-info

8. Monitor Your Node
a) Check that your node is participating in consensus and producing blocks with:
grep "execute_state_transition" /var/log/rusk.log
Your stake needs at least 2 epochs, or 4320 blocks, to register and then begin producing blocks. My node has transitioned to a block producer
b) Check the rewards your node has received for producing blocks:
rusk-wallet stake-info --reward
 c) Check persistent logs to make sure your node is active:
tail -F /var/log/rusk.log
Node Maintenance
1. Node Update
Download and install the latest version of the ITN installer. Then check logs to make sure the node is running correctly.
You can check for the latest version here.
a) Run these commands:
service rusk stop
curl --proto '=https' --tlsv1.2 -sSfL https://github.com/dusk-network/itn-installer/releases/download/v0.1.6/itn-installer.sh | sudo sh
service rusk start
service rusk status
tail -F /var/log/rusk.log
 Şuna benzer hatalar görüyorsanız:
ERROR kadcast::handling: Unable to insert node - NETWORK MISMATCH
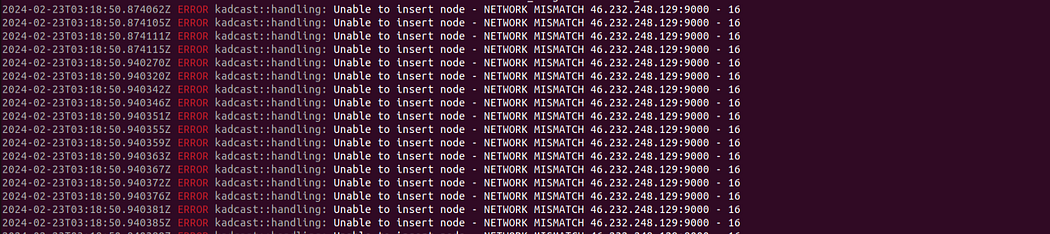 Endişelenmeyin, bu, düğümünüzün yeni ağa başarıyla katıldığı ve yükseltilmeyen düğümlerden gelen mesajları reddettiği anlamına gelir.
2. Manuel Yeniden Senkronizasyon
Bir ağ bölünmesi nedeniyle, düğümüm 50639 bloğunda takıldı ve manuel olarak yeniden senkronize edilmesi gerekiyordu. a) Mevcut blok yüksekliğini kontrol edin:
curl --location --request POST 'http://127.0.0.1:8080/02/Chain' --header 'Rusk-Version: 0.7.0-rc' --header 'Content-Type: application/json' --data-raw '{
    "topic": "gql",
    "data": "query { block(height: -1) { header { height } } }"
}' | jq '.block.header.height'
50639 — blok gezgininde gösterilen mevcut yükseklikten çok daha düşük
grep "block accepted" /var/log/rusk.log | tail -n 5
 Also no new recent log entries — node is stuck
b) Unstake from node:
rusk-wallet unstake
 This also took a couple of attempts
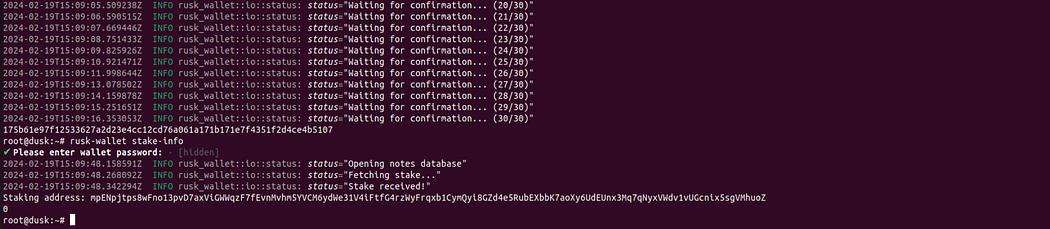 Successfully unstaked
You can check with:
rusk-wallet stake-info
c) Düğümü durdurun:
service rusk stop
d) Zincir verilerini ve önbelleği kaldırın:
rm -rf /opt/dusk/rusk/chain.db/
rm -rf /opt/dusk/rusk/state/
rm -rf ~/.dusk/rusk-wallet/cache*
e) Düğümü yeniden başlatın
service rusk start
f) (a)'daki komutların aynısını kullanarak senkronizasyon ilerlemesini izleyin:
grep "block accepted" /var/log/rusk.log | tail -n 10
 Yeni günlükler ekleniyor
curl --location --request POST 'http://127.0.0.1:8080/02/Chain' --header 'Rusk-Version: 0.7.0-rc' --header 'Content-Type: application/json' --data-raw '{
    "topic": "gql",
    "data": "query { block(height: -1) { header { height } } }"
}' | jq '.block.header.height'
Mevcut blok yüksekliği 760'tır
g) Restake — düğüm ağ ile tekrar senkronize olduğunda, stake edinizi ona geri ekleyebilirsiniz:
rusk-wallet stake --amt 1000
Son
Düğümünüz şimdi çalışıyor olmalıdır. Düğümü çalışır durumda tutacak, böylece VPS ve düğüm blok üretmeye devam edecektir.rusk erviceexit
Şimdilik bu kadar. Bu kılavuzu, mevcut olduğunda ilgili bilgilerle güncelleyeceğim. Umarım faydalı olmuştur. İyi şanslar!